Tablesaw Taper Jig
By Rick Christopherson
Most woodworkers strive diligently to make a piece of wood square,
and have a hard enough time with that. To deliberately make a piece
of wood tapered can really take some finesse. Making a tapered table
leg can sometimes be a rather daunting task.
I have heard of a method for doing this on a jointer, but this
method has some inherent problems. Since each successive pass on the
jointer relies on the previous pass, the slight variations in cutting
depth and angle will be compounded several-fold. This will result in
a leg which is not symmetrical, and successive legs may not end up
the exact same size.
Using a jig on the tablesaw can eliminate these particular
problems. No matter how many passes you choose to make, the leg will
still be symmetrical. No matter how many copies you need, they will
all be the same size. These are the primary keys to this method.
The Sled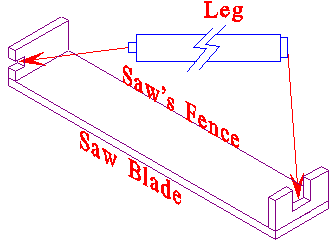
The first step in setting up this method is to create a sled
to hold your leg at an angle while you run it through the tablesaw.
The actual size and configuration of this sled will depend on the
angle of your taper, the size of your blank leg, and the amount of
non-tapered surface you need at the top of the leg. In the drawing to
the right, I have drawn up a simple sled for tapering table legs.
There are three main components to this sled: The bed, The head, and
The tail. The bed is the bottom side, and its sole purpose is to
fasten the head and tail pieces. The head is the vertical portion
furthest from the operator, and holds the narrowest (tapered) portion
of the leg. The tail is closest to the operator, and holds the top of
the leg (the thickest end).
You will need to cut a notch in both the head and tail pieces of
your jig. The notch in the head piece is on the side, while the notch
in the tail piece is on the top. The size of these notches is up to
you, but they should be smaller than the final dimensions of the
finished leg. In other words, if the bottom (thin end) of your leg
was going to be 1 inch on each side, then your notch should be 3/4"
on each side. This keeps your leg positioned firmly between the head
and tail, and also means that your sled's bed doesn't run against the
saw blade during the final pass. Furthermore, make sure that when you
cut these notches, that they accommodate the position of a "rough"
leg. That is to say, don't make the head notch so low that you can't
get the rough leg into position for the first cut.
Note that for some setup's, it may be necessary to turn your head
and tail pieces to match the angle of your taper. Primarily, this
should be if your taper runs the full length of your leg. But you are
better off turing them if feasible.
Preparing the Leg
The first thing to do is cut your leg to a rough working length. This
length can be what ever works best for you, but it must be at least
1-1/2 inches longer than your final length. This is to accommodate
the temporary tenons which will be cut next.
Using either the tablesaw with a cross-cut jig, or a radial arm
saw, cut tenons at both ends of your leg. These tenons should be
sized to fit snugly into the notches cut into your sled. (note that
your notches don't need to be identical. I have drawn mine as 3/4"
square and 2" square to show this.) Even if your notches are deeper
than they are wide, your tenons must be square. (Yes, your
notches may end up non-square either by error or by design. This
feature may come in handy if you need to tweak your sled slightly.)
The length of your tenons should be so that the main body of the leg
fits snugly between the head and tail pieces of the sled.
Running the Legs
The first thing you need to do is to secure the leg into the sled. If
it is a big enough leg, you may be able to simply hold it in place.
For smaller legs, you may have to fasten it in place. If you need to
fasten it, keep in mind that you will need to remove the fastener and
rotate the leg with each pass. A screw though the top of your head
piece would work; but a screw through the side of the tenon would not
work well.
For the first pass, set your tablesaw's fence far enough away so
that you don't cut the full taper yet. The saw blade should be high
enough to completely cut through the full thickness of the leg
(preferably with the blade 1" above the top of the leg's surface). If
your saw is under powered, and you must make several passes on
all of the legs, then you must make a first pass on all of the
legs before you move your fence.
For each pass on a leg, you must remove the leg, rotate it 90
degrees, and repeat this for all 4 sides. Do not change your fence's
position until all legs have been cut the same. If you move the fence
between each leg, they will not be the same size. While a minor
variation in thickness wouldn't be noticeable, this would result in a
significant variation in taper length.
For the final pass, only move your fence slightly, so your cut is
rather shallow. This should reduce the amount of saw marks on the
edges.
Cleanup
If you need to, you can also run each side of all of the legs through
the jointer for a cleanup pass. This is risky, as there is no
guarantee that the jointer will cut evenly on each surface. (If you
don't believe this, take a board and run it through the jointer
several times and then check the edges to see of they are still
parallel. They won't be!) If you do this, have your jointer's
depth-of-cut set as low as possible while still removing the saw
marks. Do not run each edge through the jointer more than once, even
if there are marks still left behind. If you must run one leg through
more than once, then I would recommend running all of your
legs through twice, not just the bad one.
By cutting your legs longer than they need to be, you also have a
little leeway to trim each leg down enough so that the tapers are the
same length (especially if you ran them through the jointer). The
final step is to cut the temporary tenons off of each leg. If your
legs must be flat to the floor, then you will need to set up some
sort of jig on your cutoff saw to accomplish this (This is true
regardless what method you use to create the tapers by the way, and
it is also dependent on the angle in which your legs will be mounted
into the table too.)
If you found this article from a search engine, and would like to
jump to the Waterfront Woods Home page, click on the image below.

 Email
Rick Christopherson
Copyright 1998, Rick
Christopherson
Email
Rick Christopherson
Copyright 1998, Rick
Christopherson
