| The top of the table is made
from 8 pie shaped wedges. I learned on the first table that there can
be no shortcuts in creating precise angles. I had cut the wedges to
within a fraction of a degree, and then used an edge sander to fine
tune each piece to fit with the adjacent piece. Everything was fine and
dandy until I put the leaves in between the wedges and realized that
the minor differences from the tweaking caused the parts to no longer
line up. I ended up re-trimming all of the parts for the original table
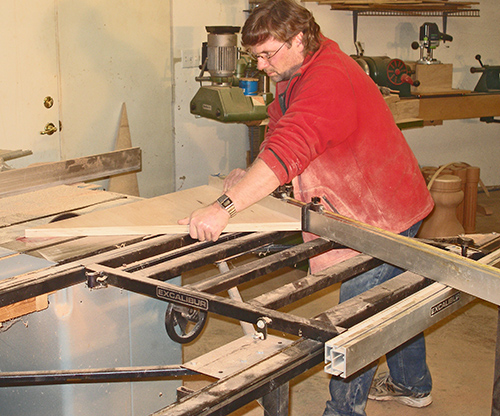
to precise 45 degree angles. So for this table I knew from the outset that all of the parts had to be precisely cut to ridiculously tight tolerances. This would require multiple iterations to achieve a 22.500 degree cut within a couple thousandths of a degree. For the first pass, I set the sliding table to 22-1/2 degrees with as much accuracy as the table permitted. With two cuts per piece, any error in the angle would be multiplied by 16 times. The distance between the pivot point and the angle gauge is about 30 inches, so the sliding table is the most accurate miter gauge in the shop, and the distance between degree graduations is nearly 1 inch. The bad part is that now that the miter angle is dialed in so perfectly, I can't change the saw over to any other purpose until I complete similar cuts for the leaves. I can slide the table behind me to make rips that are less than 4 feet long, or I can make longer rips as long as there is no more than 1 inch of offcut to the left of the blade. |
 |
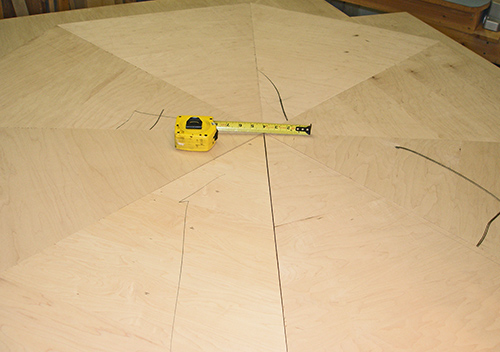
| After making the first pass on
the saw, I laid out all 8 wedges, keeping the first 7 joints tight so
the entire error would be visible in the eighth joint. I ended up with
a gap at the center of about 1/8 inch. This meant that each cut was off
by just 1/128th of an inch over a distance of 30 inches. This meant my
first attempt was actually 22.515 degrees, or an error of 0.0149
degrees. As I was about to adjust the miter fence on the sliding table, I realized that the distance between the pivot point to the miter gauge was almost identical to the length of the wedges. This meant that all I needed to do to adjust the fence, was divide the original gap of 1/8 inch by 16. The adjustment I made on the sliding table was to move the fence from the center of the 22.5 degree index line to the outside edge of the line. I recut all 16 miters and lucked out. With just my second iteration, I had no gaps when the pieces were laid out. Oh, in case you're wondering about the odd marks, a broken piece of pencil lead got stuck under the sheet of plywood as I was cutting it up into the wedges.
|
 |
|
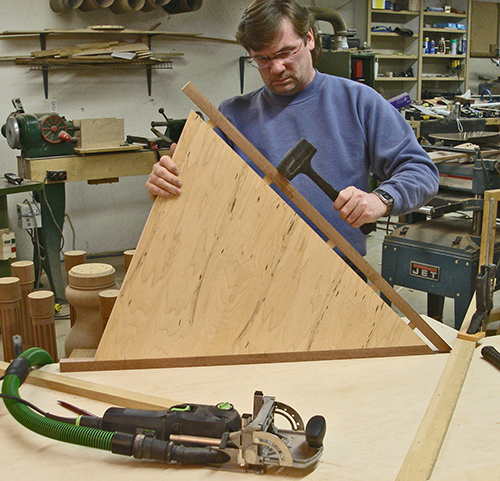
I don't recall if I mentioned this earlier,
but you cannot use solid lumber in a radial pattern such as this table.
As the wedges expand or contract, the angle would change from the
perfect 45 degrees. In the winter, the table would have gaps at the
outside, and in the summer it would have gaps in the center. This is
why I used the high-density maple plywood as the core material. I could have edged the plywood with a thin
veneer or even a thin piece of solid mahogany, but because the edges of
these pieces will have alignment pins and sockets mortised into them, I
wanted to use a thicker edge. I milled up some 1 x 1 mahogany strips and
joined them to the sides using 8 x 40 mm tenons. You'll notice that I
lapped the joint at the point of the wedge. I didn't want to have a
67-1/2 degree miter at the point, as this would have weakened the
point. This joint won't be visible, but there will be hardware that
mounts to the point of each wedge. |
 |
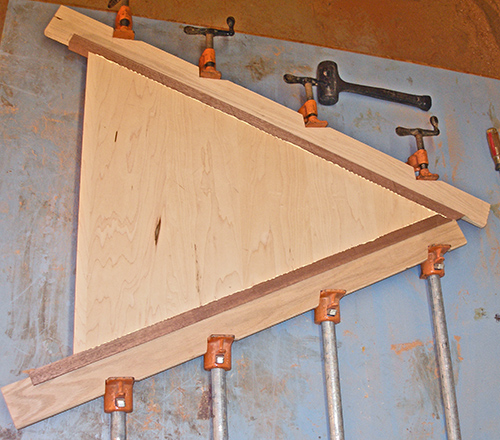
| At first when I clamped the
edging to the pieces, I clamped two of them at the same time so the
angles canceled out. This was too much of a hassle, so I decided to
make some clamping jigs on the bandsaw. It not only made the clamping
easier to set up, but allowed me to get more clamping pressure onto the
joint. As simple as these boards look, there was a little bit of thought into them. Each board hooks on the end of the edging to keep the wedge from squirting out, but the edging pieces are of different lengths (kind of), plus they can't extend past each other. By the way, I used to use this part of my tablesaw extension table for staining. After taking this picture I decided it was long overdue for a cleaning. It took over an hour of scrubbing with acetone to get most of the stain off the Formica surface. It's not perfect, but you'll see in a picture below that it is much better than how it looks here. |
 |
| After gluing all of the side
edging, I trimmed the lengths. Actually, prior to this, all of the
wedges were of different lengths too. Because the sliding table is
still set to the accurate 22-1/2 degrees, I was able to use it to
crosscut each piece and be confident the angle was correct.
Technically, this cut is not critical because the circular arcs I cut
later will compensate for any minor error. However, what would be critical is how this edging affected the joints between pieces. I put all the pieces back together to examine their alignment. There was a couple of pieces that had gaps, so I decided to run each wedge through the jointer with a very shallow pass. This straightened the edging out and all 8 pieces once again fit together tightly. |
 |
| After the edges were glued, cut,
and jointed; I installed the caps that will be visible on the edge of
the finished table. The other pieces will never be visible except when
the table is being opened or closed. These pieces will be visible all
the time. I wanted to have all of the visible edges of the table to be consistent, so they were all cut from the same plank, but furthermore, were also from the same central section of the plank. This meant that I needed to scroll my way through the rough pieces with the bandsaw. In other words, I took an 8 inch wide board and weaved my way down the center to rough-cut these pieces. That is why you'll see the wavy edges to these parts. I joined each piece with four 8 x 40 mm Dominoes and dry-fit the joints before gluing. The stack of wedges to the lower-left are dry-fit and waiting for the previous pieces to be finished in the clamps. |
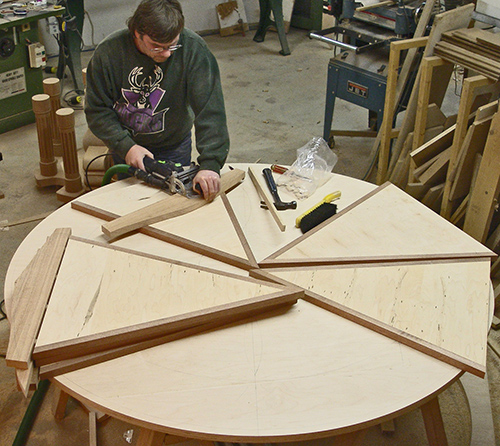 |
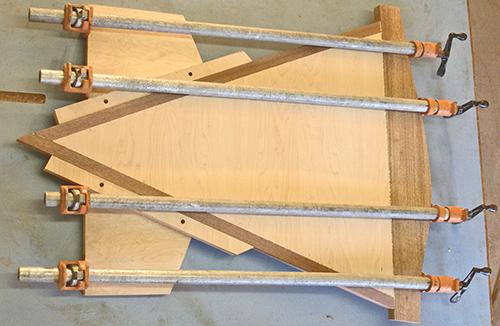
| To glue up the end caps, I needed
to make a clamping jig that cradled the tip of the wedge and gave me a
surface to clamp against. It was a simple jig to make, but after making
this first one, I realized that if I had moved the cross-board further
up, I could also re-use the jig as a trammel for cutting the arcs. So I
decided to make a second jig where the cross-board was beyond the
center point of the wedge (this one is shown in the bandsaw picture
below). Yeah I know, my saw table is still pretty stained, but compared to the previous picture, it is a lot better. But hey, it's a workshop. If it wasn't for these pictures, I wouldn't have bothered cleaning it at all. |
 |
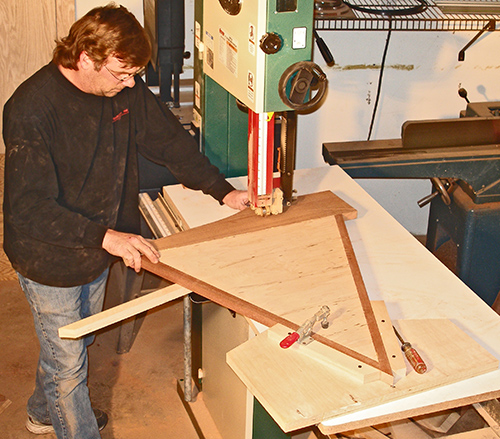
| To cut the arcs in the ends of
each wedge, I used one of the previous clamping jigs to make a trammel
point for the bandsaw. I re-installed the melamine extension to the
bandsaw bed, then I drilled a hole at the center point of the clamping
jig and in the extension board. When I realized that the wedge
workpiece could still slide out of the trammel jig, I installed a
DeStaCo clamp to the trammel jig to securely hold the workpiece. Cutting each arc was simple, but I kept the bandsaw feed-rate low to make sure the blade wasn't being pulled off-track through the arc. When the arc cut was finished, I set the tablesaw fence to minus 1/8-inch (the thickness of the blade) and retracted my UniFence behind the blade to trim the ends of the boards flush to the side trim. I realize that my description may not make sense to you, so it might be easier to visualize if you consider that I set up the tablesaw as though it was a jointer for this last cut. These cap-boards were cut flush to the existing side boards. The final step for the wedges is that I flushed up the joints by running them through the wide-belt sander. |
 |
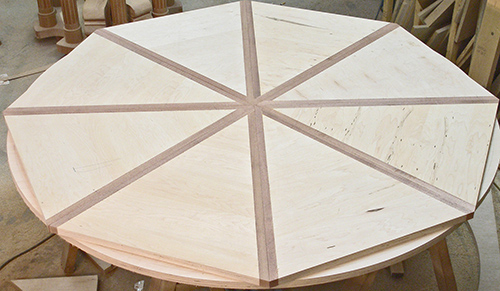
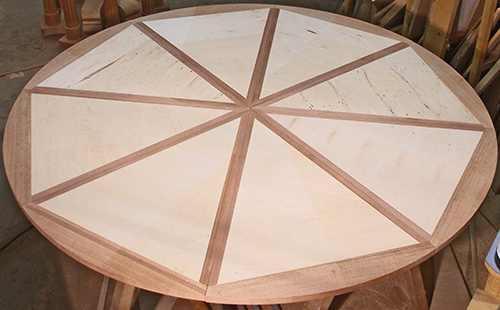
| After bandsawing the arcs on
each of the wedges, I ran them through the widebelt sander to flush up
all of the edging with the plywood core so I can later laminate the
veneer over them. I didn't really have any reason for laying the wedges back out on the substrate except to take this picture. If it looks like the circle is not perfectly round to you, it is just an optical illusion because of the shape of the triangles. |
 |
Up Next: The arrow-shaped leaves. |
|
| <<PREVIOUS NEXT>> |
 |