Phase Converters
By Rick Christopherson
Note: This article is being completely rewritten
with new information, more explanation, new graphics, and a source for
the parts to make a converter. Check back later for updates.
Sometimes a woodworker will find himself with a 3-phase tool, but his
shop only supplies single phase, 240 volt power. 3-phase motors are
common for industrial grade tools, as their efficiency is higher than
their single phase counterparts. In order to operate a 3-phase motor
on single phase power, we need to make an artificial three phase
system. This is accomplished by using a phase converter.
The phase converter will artificially generate the third leg of a
three phase system from the two poles of a single phase system. This
is not a perfect transformation, but it does get the job done. There
are two types of phase converters: the static phase converter,
and the rotary phase converter. The rotary phase converter is
built using a static phase converter, plus an idler motor.
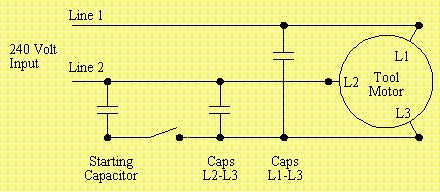 Balanced Static Phase Converter
The static phase converter is the basic building block for any phase
converter, and so it makes sense to start with that. With the static
phase converter, the motor will only receive about 80% of its normal
operating power. Additionally, you need a separate static phase
converter for each three phase motor. These are the primary drawbacks
to the static phase converter. However, the static phase converter is
very simple to build. This loss of power is balanced by the lower
cost of the static phase converter. The significant cost
savings is why static converters are so popular.
The drawing above shows a balanced static phase converter with a
starting circuit. The starting circuit provides enough current to the
motor to get it started, but then must be disconnected to prevent too
much current from flowing through the motor after it starts. There
are more rudimentary phase converters, but this design provides
better performance with lower running currents.
Getting Started
The first step is to select the capacitor sizes that will be needed.
This is generally just trial and error, as the capacitor sizes will
depend on the motor. I went to an electronic surplus store and
located several capacitors for a couple of dollars each. These
capacitors should be rated for at least 250 volts AC. For my 1 Hp
lathe, I ended up using a 5 uF (microfarad) cap between L1&L3,
and a 12.5 uF cap between L2&L3, and about 80 uF for the starting
capacitor. These numbers should be a good starting point, in that
their ratio should remain similar for larger motors. For my 5 Hp
rotary converter, these numbers are 25 uF for L1&L3 and 50 uF for
L2&L3, which is approximately 5 times larger than those for the 1
Hp converter.
At the surplus store, I located capacitors ranging from 1, 3, 5,
10, 12.5, 15, and 20 microfarads in the 250 volt range. What you will
want to do, is get several capacitors of different sizes so you can
fine tune the converter. Keep in mind that you can make a capacitor
smaller or larger by combining it with other capacitors. Two
capacitors connected in parallel will add to each other, and two
capacitors in series will "get smaller".
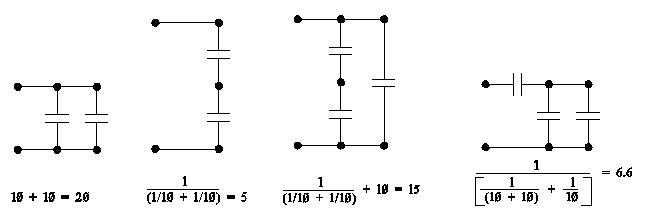
Explaining how we add capacitors together is a little complex, so I
am hoping that most of this can be understood by example. From the
lefthand circuit in drawing above, two 10 uF caps in parallel will
total 20 uF. We just add their values together. In the next
circuit, we have two capacitors in series. Two 10 uF caps in series
will total 5 uF. For series connections, we add their
reciprocal values, and then take the reciprocal of that. For
combination series/parallel circuits, we look at the circuit
as two separate problems. In the next sample, we have two caps in
series giving us 5 uF as before, which is then in parallel with
another cap, so the total is 15 uF. In the last sample, we have two
caps in parallel giving us 20 uF, which is then in series with
another, and the result is 6.6 uF. Using these various combinations,
we can get nearly any size capacitor we want. I used 10 uF capacitors
for this example, but they don't need to be the same size. Take the
third sample as an example: this would be the same as a parallel
combination of a 5 uF and a 10 uF.
I have to admit, that when I bought capacitors for the lathe, I
was way off the first time. I picked up a bunch of 20 uF caps, but
these were too large. Because I bought enough of these to build
converters for two lathes, I had enough of them to make some complex
combinations during the initial sizing. After I found out the final
sizes, I went back to the store and picked up smaller capacitors for
the final assembly. If you think about it, even making a mistake in
your initial purchase is still cheaper than buying a store bought
phase converter.
Initial Setup
To start out with, I would set up the converter using the numbers
provided above. For a 1 Hp converter, I would use 5 & 12 uF caps
between the lines, and whatever capacitors are left over are used for
the starting circuit. If the 5 and 12 aren't available, use whatever
is close for now. For the initial capacitor sizing, the following
rule should be helpful:
CL1-L3 = 4 to 5 times the motor horsepower
CL2-L3 = 10 to 15 times the motor horsepower
Cstarter = 40 to 100 microfarads just for testing
For testing purposes, I used a standard light switch to control
the starting capacitors. For some of the configurations, I did not
have enough capacitors left over to provide a sufficient starter. For
these situations, I used a pull-cord (like starting a lawnmower) to
get the motor started.
After you have the initial setup, it is time to turn the motor on.
Close the switch for the starting circuit, and press the start
switch. If the motor takes more than 2 seconds to get up to full
speed, shut it down immediately. You can either add another capacitor
to the starting circuit, or try using a pull string. If your motor
turns backwards, then just reverse the wires on your motor. (At the
motor, take any two of the three wires and swap them.) Once the motor
is up and running, it is time to fine tune the capacitors.
Tuning the Capacitors
To fine tune your capacitors, you need to check the voltages between
each phase of the motor. The 3 phases used by the motor are A-B-C, or
also refered to L1-L2-L3. To check the phase voltage, place each
probe from a voltmeter on the respective phase. Phase A-B (Phase A to
B) will be 240 volts, which is the line voltage of your house. One of
the phases will be low, and the other will be high. You will need to
adjust the capacitors until these voltages get close to being
balanced out. If you find one of these voltages extremely high, turn
the motor off immediately. There are some configurations where
one phase's voltage can exceed 350 volts. This will put high currents
through the motor, and that is not good. Forgetting to turn your
start circuit off is one example of this.
To determine the best configuration of a phase converter, I have
found it best to create a data table and write down the various
values. I first vary one capacitors size larger and smaller from the
initial configuration. Then I vary the other capacitor. You should be
aware that when you connect a new capacitor to one which was just
powered, there will probably be some sparks as one capacitor charges
up the other. This is disconcerting, but it is normal. Make sure you
turn off the power before rearranging the capacitors.
The data table below is from my lathe. This isn't the order I
collected the data points in. Instead, I sorted the data in this
table based on the capacitor size between (A) and (C), so that the
information is more presentable. Unfortunately, I had tried a couple
of larger combinations before I started writing down the results, so
these are missing. All I can remember about these first trials was
that I started with 20 uF and 40 uF, but the voltages were so far out
of line, that I quickly realized I needed to use much smaller
values.
|
A-C Caps
(uF)
|
B-C Caps
(uF)
|
A-C
volts
|
B-C
volts
|
|
3.8
|
10
|
230
|
212
|
|
3.8
|
20
|
260
|
234
|
|
4
|
13.3
|
240
|
220
|
|
4
|
16
|
249
|
226
|
|
4.7
|
10
|
233
|
212
|
|
4.7
|
13.3
|
242
|
218
|
|
4.7
|
20
|
263
|
233
|
|
4.7
|
40
|
300
|
260
|
|
5
|
10
|
234
|
212
|
|
5
|
12.5
|
243
|
218
|
|
5
|
13.3
|
242
|
218
|
|
5
|
16
|
250
|
224
|
|
5
|
20
|
263
|
233
|
|
6.6
|
10
|
236
|
208
|
|
6.6
|
13.3
|
245
|
215
|
|
6.6
|
16
|
253
|
221
|
|
6.6
|
20
|
266
|
230
|
To see this data better, I have created a graph which shows the
relationship between the two voltages. Graphing the data isn't
necessary, nor did I use this, but it may help you see how different
configurations effect the outcome.

From the data table and chart, there are a couple of
configurations which work fairly well. Notice that at no time do all
three phases reach 240 volts. This would be a perfect conversion. The
best I could attain was 240 volts from (A) to (C) with 220 volts from
(B) to (C). While I could get more power out of my motor when the
voltage from (B) to (C) was closer to 240 volts, this would make the
voltage from (A) to (C) much higher than 240 volts, which results in
too much current flowing through that set of windings.
These are the conditions I looked at when selecting the capacitor
sizes:
- I wanted the phase voltages to be as close to being equal as
possible.
- I did not want any voltage to exceed 240 volts.
- While still adhering to items 1 and 2, I wanted to use the
least number of capacitors.
With respect to item #3, even though the motor performance was
best when using 4 uF and 13.3 uF, this required 8 capacitors to
achieve this combination. Since the performance when using 5 uF and
12.5 uF capacitors wasn't much different, I chose this combination.
This decision was made after the testing, when I returned to the
store and located 5 uF and 12.5 uF capacitors. (I want this phase
converter to be small enough to fit in a junction box bolted to the
inside of one of the legs.)
Configuring the Starting Circuit
The purpose of the starting circuit is to get the motor up to speed
as fast as possible. The longer it takes to get the motor up to
speed, the longer high currents will be present in the motor's
windings. For the most part, the larger the starting capacitor, the
faster it starts. My desire is to have the motor completely up to
speed within one second with the least number of capacitors. Even
though using a monstrous sized capacitor would bring the motor up to
speed very fast, this would also run the risk of causing damage too.
To select the right size, I just keep adding more capacitors to the
circuit until the motor starts quickly.
What I find to be more intriguing is the potential for the
starting circuit to be automatic. My rotary phase converter has been
in service for about a year now, and there have been times when I
forgot to shut the starter back off. There are three methods for
activating the starter circuit: a manual on/off switch, a momentary
contact switch (push and hold button), and two types of fully
automatic switches.
Manual on/off Switch
The simplest method for engaging the starting circuit is the use of a
standard on/off switch. This requires the operator to turn the switch
on before starting the motor, and turning it off after the motor is
up to speed. The drawback to this, is that it requires the operator
to activate and deactivate the switch. Failure to do either of these
will result in excessively high currents in the motor.
Momentary Pushbutton
The momentary pushbutton is better, since you can't forget to turn
your start circuit off when the motor is up to speed. With this, the
start circuit is only engaged for as long as you hold the switch in.
The drawback, is that the switch can be released too soon, before the
motor gets up to speed. This would result in high currents flowing
through the motor unless the start switch was again pressed. And if
the switch was not released on time, currents would again be high
after the motor gets up to speed.
Off-Delay Timer
With most switches and relays, when you tell them to turn off, they
turn off. With an off-delay timer, when you tell it to turn off, it
hesitates for a little bit before it turns off. This is ideal for a
starting circuit, where we only need it to be active for a second or
so. With an off-delay timer, we would use the momentary push button
to activate the relay, and releasing the button would activate the
timer.
The benefit to this setup is that you can't forget to turn the
starter off, yet it will always remain active long enough to get the
motor started. The drawback to this setup is almost trivial. If the
timer is programmed too long, then the starter will remain active
slightly after the motor is up to speed. Unless you had a method for
sensing the actual speed (RPM's) of the motor, this is the most
foolproof method for operating the starting circuit.
Current or Voltage Sensing Circuit
Since the time this article was written, I have
completed the self-starting aspect of my lathe's converter. The
discussion below is a duplicate from the writeup on that project.
 How this works, is when I press the normal start button
on the lathe, the starting capacitors are already engaged. As the
motor comes up to speed, a relay senses the increase in the third
phase voltage. As this relay becomes active, it opens a switch, which
disconnects the starting capacitors. As a side effect, if I grab the
hand wheel and slow the motor down, the starting circuit re-engages
to bring it back up to speed. This is what made me decide to make the
unit self-starting. Before I completed the self-starting aspect of
the converter, I loaded the motor just to see how much power I was
getting. I slowed the motor too much, and it would not come back up
to speed. I didn't want this to happen during normal use. The diagram
above is the same as before, except I replaced the normal switch with
a relay, and added a diode and variable resistor. A very significant
benefit to this circuit is that it automatically compensates when the
motor is slow to start.
How this works, is when I press the normal start button
on the lathe, the starting capacitors are already engaged. As the
motor comes up to speed, a relay senses the increase in the third
phase voltage. As this relay becomes active, it opens a switch, which
disconnects the starting capacitors. As a side effect, if I grab the
hand wheel and slow the motor down, the starting circuit re-engages
to bring it back up to speed. This is what made me decide to make the
unit self-starting. Before I completed the self-starting aspect of
the converter, I loaded the motor just to see how much power I was
getting. I slowed the motor too much, and it would not come back up
to speed. I didn't want this to happen during normal use. The diagram
above is the same as before, except I replaced the normal switch with
a relay, and added a diode and variable resistor. A very significant
benefit to this circuit is that it automatically compensates when the
motor is slow to start.
After I managed to build the self-starting converter, I made a
significant observation. When the lathe was set for low speed, the
motor came up to speed quickly, as it's load was low. When the lathe
was set at a higher speed, inertia made the lathe start slower, and
it took longer to come up to full speed. This circuit compensated for
the longer start-time, and remained engaged for a longer period of
time. Had I used the "off-delay timer", this would not have been the
case.
Initial Concept: While I was fine tuning the phase
converter's capacitors, I noticed that the voltage from line 2 to the
generated line 3 started out at 16 volts before I started the motor.
As the motor came up to speed, this voltage gradually increased until
it reached its final value of 220 volts. Since the voltage seemed to
be related to the speed of the motor, I figured that if I could
harness this variation, I could control when the starting capacitors
were removed from the circuit. To do this, I needed to come up with a
"voltage controlled switch".
Relay: The relay uses the normally closed contacts, which
means that when there is no power to its coil, the contacts are
touching. The relay's coil is rated for 120 volts at 60 Hz (AC
power). Since I am feeding it with 240 volts (actually it is 220
volts in this case), I needed to reduce the voltage. Although I never
bothered taking actual measurements, this relay would become active
when the coil voltage reached about 70 volts. All I had to do was
make sure that the coil's voltage reached 70 volts when the motor was
near full speed.
Variable Resistor: The variable resistor acts as a fine
tuning control. Some of the circuit's voltage is expended across this
resistor. By adjusting the amount of resistance in the dimmer, I
control how much voltage the relay gets. I had already burned up a
couple of normal variable resistors because they were not rated to
handle this kind of current. It suddenly hit me that a dimmer switch
for home lighting was cheap, and rated for this kind of power
consumption. Since I couldn't find a common variable resistor with
large power capabilities, I went to a home center and picked up a
common wall dimmer.
As I adjusted the dimmer, the starter control would either turn
off too soon, or not at all. By making these adjustments, I
controlled how long the starter remained active with respect to the
motor's speed.
Diode: I don't know why I needed this, but it was a
necessary part nonetheless. My relay was rated to operate on AC
voltage. A diode blocks part of the voltage which results in a
"sloppy" DC voltage. Without this diode, the system was
self-defeating. As soon as the start button was pushed, the starting
capacitors resulted in a high enough voltage to activate the relay.
The relay would then disengage the capacitors, but they were the
cause of the higher voltage. As soon as the capacitors were
disengaged, the voltage was too low to activate the relay, and the
relay would re-engage the capacitors. The bottom line was that the
relay would flicker on and off, but the motor would not start. I
fully expected this to happen when I used a DC rated relay, but the
AC rated relay shouldn't have done this. I can only surmise that it
is because I cut the voltage in half by using the diode.
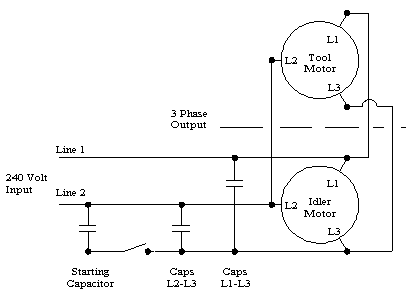 The Rotary Phase Converter
With the discussion above on the static phase converter, there isn't
much to explain about the rotary converter. The rotary converter is
nothing more than a second motor in the circuit which is acting as a
generator. With the static converter, the tool's motor performed this
function, but at the cost of some loss of power. With the rotary
converter, the idler motor is under no physical load, but it cleans
up the signal a little. If you examine the drawing below compared to
the first drawing, the only difference is that we added the idler
motor.
The output of the rotary phase converter is closer to being a true
3-phase source than the static converter. This provides more power to
the tool motor, and also brings it up to speed faster. The rotary
converter is best served when you have a motor which is started and
stopped frequently, and you need the full power of the motor.
Furthermore, a single rotary converter can drive several different
3-phase tools.
Setting up the rotary converter is the same as the static
converter described above. The only decision to be made is the size
of the idler motor. The idler motor needs to be larger than the
largest tool which will be operated.
Since the static converter will provide a motor with 80% of it's
normal operating power, and the rotary phase converter uses a static
phase converter as a starter, your idler motor should be 125% of your
tool(s) motor size. That is, if your tool is a 5 horsepower motor,
your idler should be between 6 and 7 horsepower. It is always better
to err on the high side, so I would use a 7 horsepower idler motor.
If the converter will operate more than one tool, make sure the
current rating of the idler motor is 125% of the sum of the tool
motors.
If you found this article from a search engine, and would like to
jump to the Waterfront Woods Home page, click on the image below.

 Email
Rick Christopherson
Copyright 1998, Rick
Christopherson
Email
Rick Christopherson
Copyright 1998, Rick
Christopherson
