So, does the sheetrock just behind your table saw have dents
and holes from those unexpected mishaps? You're not alone. Virtually
every user of this tool has had at least one minor catastrophe of
some kind or another; or worse!
For the majority of woodworking shops, the tool which plays one of the most important roles, and has the highest frequency of use, is the table saw. For as much as the table saw is used, there are many hobbyists and professionals alike who do not have a complete understanding of current philosophies for operation.
There is plenty of information out there about which is the best saw or the best fence or the best blade. I don't want to rehash these issues. There is a significant amount of information regarding table saws which is not normally discussed in manuals or other informational sources, and this is where I would like to concentrate.
The best source for safety information is your owner's manual. You should read this thoroughly, and understand it fully. However, there are some issues which are not typically found in owners manuals.
1.1 Dangerous Tool?
Someone once asked me, "what is the most dangerous tool or operation
in the shop?" The answer is simple: One tool. One operation.
The most dangerous tool or operation in any type of shop is the one
that you don't think will hurt you! The second most dangerous tool or
operation in the shop is the one that you are afraid of.
This first statement is pretty obvious. If you don't respect the danger of a tool, it will eventually come back to bite you. The most innocuous looking tool in your shop still has the potential to do serious harm.
The second statement mentioned above may not be quite so obvious. In short, if you fear a tool or operation, your reactions in the face of a problem will be those of fear, not rational thought. You will also bring about problems by not handling the equipment with confidence.
If you gingerly hold onto your workpiece because you are worried something will go wrong, then things will go wrong. There is a difference between having fear of a tool or operation, and having respect for it. Don't operate a tool if you are afraid of it, or the particular operation.
1.2 Kickback
Kickback is one of the most dangerous and least understood problems
on a table saw. There are several causes and types of kickback, but
they all tie into the same issue: the workpiece is driven
backward unexpectedly by the saw blade.
1.2.1 Straight Line kickback
When most woodworkers hear the term kickback, the type initially
thought of, is the result of a ripping operation coming to a sudden
and dramatic stop, and the workpiece is driven back by the rotation
of the blade. There are two interrelated causes for straight line
kickback: Underpowered Saw, and Blade height.
1.2.1.1 Underpowered Saw
Kickback will occur on an underpowered saw as the saw blade slows
down, catches, and then grabs the workpiece. If the saw has enough
power to "keep driving" when an obstruction or bind is encountered,
it will not kickback.
Not only does the sheer power of the saw come into play here, but the physical weight does too. If the motor's rotor, and saw arbor are heavy, their momentum will keep the blade spinning during a sharp impact.
Over time I have used many different analogies to explain this situation, but I think the following analogy fits this best. To understand this concept, take two identical strips of sheetrock, or similar strips which will break fairly easily, and lay them across two saw horses. Next you will take a hammer and swing at the boards from below, such that they get knocked up in the air. As a safety consideration, maybe you would feel more comfortable doing this with the boards propped up vertically, and you swing the hammer horizontally. For the first board, hit it hard, but not hard enough to break it. For the second board, hit is as hard as you can, splitting it in half. Since gravity is the only thing hold these boards down on the saw horses, they should both fly up in the air when you hit them.
Which board flew higher?
The board that did not break will fly higher every time. This is because all of the energy from the hammer was transferred to the board in the form of motion. For the board that broke, the majority of the energy was expended in breaking the board, and very little is left over for propelling it. Try this several times if you wish, but notice that the harder you hit the board, the less it moves off of the saw horses. Taken to its extreme, if you hit the board hard enough, it won't even move at all, but will be sliced clean through and fall to the floor.
This is exactly what a saw blade is doing when it cuts wood. If the blade is not cutting the wood, then it is pushing it backward.
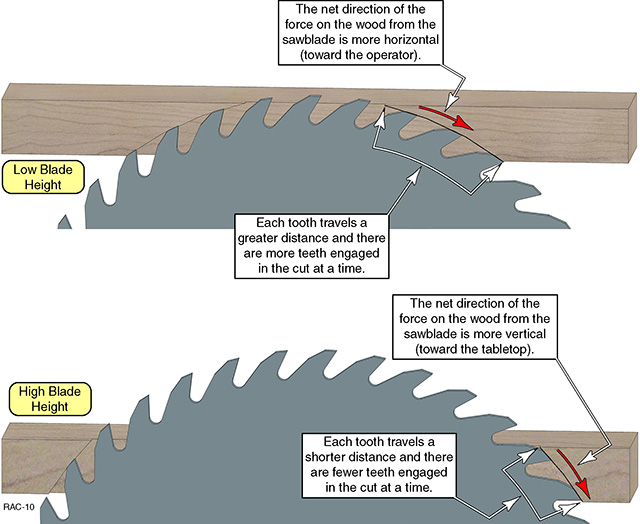
1.2.1.2 Blade Height
The second major cause for this type of kickback (and many other
problems too) is due to a low blade height. The old school of thought
was to keep the blade as low as possible for the cutting operation.
Even though there is a danger in having the blade protrude above the wood too high, there is an even greater danger by having it too low.
You can see this in the figure above. When the blade is set low, the overall force of the teeth on the workpiece is generally in the forward direction. When the blade is set higher, the force is directed downward. The two larger red arrows in each figure show the net direction of the force for each blade height. This arrow in the lower view is pointed more downward than it is in the upper view.
The other issue with a low blade height is motor drag. There is a greater drag on the motor because there are more teeth in contact with the wood at any one time, and each tooth cuts a longer path through the wood. In the upper figure, there are 5 teeth in contact with the wood, yet in the lower drawing, there are only 3 teeth in contact.
As an analogy for this idea, take a piece of 1x4 lumber and cut it with a hand saw. For the first cut, keep the saw parallel with the 4 inch side of the wood. For the second cut, keep the saw perpendicular with the 4 inch side of the wood. It will be quickly obvious that cutting the board is a lot easier when your saw is perpendicular to the board: the way we normally hand-cut a board.
Low blade height will increase heat buildup and drag on the motor. Not only is the heat bad for the blade, but since the blade is already being slowed, and the motor is operating closer to its stall rate than necessary, kickback's are more likely to occur.
Don't take this to the extreme. You should not raise the blade up too far, as this is dangerous too. I prefer to have a blade height which is about 1 inch to 1-1/2 inches above the wood. The actual height will depend on the type of cut.
1.2.2 Back-Side, Kickback
This type of kickback is the most dangerous type, because the
velocity of the wood coming back at the operator can be nearly the
same speed as the blade. (50 to 100 miles per hour on a typical 10
inch saw.)
In a back-side kickback, the workpiece catches the rear teeth of the blade, which lifts the wood off the table and propels it forward. Once the wood starts moving, the teeth of the blade gouge instead of cut, and dig into the wood like a set of baseball cleats.
This type of kickback is most common when cutting thin sheet stock where the sheet can either be curled upward already, or the edge is flexible enough to curl upward from blade friction, and catch a forward moving tooth.
When this kickback happens, it will leave a distinctive semi-circular gouge in the back side of the workpiece. The shape of the gouge is caused by the wood being trapped by the fence as it shoots forward, rotating the piece against the near-right corner. Since the workpiece has rotated as it comes out of the blade, it's a pretty good chance that when the piece hits you in the thigh, it will be with the corner of the wood.
The best way to prevent this type of kickback is to keep an eye on the sheet product as it clears the back side of the saw blade. Don't let the wood begin to lift, and don't allow the wood to bind counter-clockwise.
1.2.3 Over-the-top Kickback
This type of kickback is growing more and more common as hobbyist
woodworkers are putting together a shop on a shoestring budget. The
two primary causes for this type of kickback are a low blade height,
as discussed above, but also using the wrong blade for the cut (or a
dull blade).
With a low blade height, the only downward pressure on the workpiece is what you apply. As a result, your forward pushing motion can cause the wood to ride up the forward edge of the blade. Once there, the top teeth of the blade are traveling directly back toward the operator.
The second issue with this is using too fine of a blade for ripping, or similarly, a dull blade. A fine blade has a harder time ripping lumber than a coarse blade. This is like ripping a board with a hacksaw.
More and more woodworkers are only buying combination blades for their table saws, even when they have the funds available to buy other blades. The salesmen have told them that the combination blade is a catch-all, do-all, tool. This is not true. Combination blades were developed for the shops which can only afford a single blade. For best results, a shop should have blades dedicated to each task
When the wrong blade is used, the wood cuts slower than typical. If the wood is not being cut well, it can ride up the radius of the blade, and lift off the table.
1.3 Hold on Annie, We're Goin' In!!
Well it sounded like a good title, but in all seriousness,
Never let go of the workpiece! No matter how rough it gets, or how
probable a kick-back will be, do not let go of the wood. I don't care
if you're Speedy Gonzales, you are not fast enough to get
out of the way of a 60 mile per hour tree stump. More often than
not, by holding fast, you will actually prevent the kickback in the
first place. Over the years I have trained my reflexes not to panic
and jump away (this is contrary to the natural "fight or flight"
instinct in all of us.) Instead, I will hold on tighter, or even
drive the piece forward depending on the circumstances.
Just a couple of months ago I was ripping some oak for faceframes. I either didn't notice the end-check, or didn't think much of it, but this check (a split at the end of a board) was different, in that it ran diagonally at about 20 degrees, and into the wood about 6 inches. When the blade hit the tail end of the check, it freed the wedge-shaped piece to move. The friction of the blade carried the wedge further into its own slot, which increased pressure on the side of the blade, and increased friction...yada, yada, yada...a vicious circle. I naturally held tight, but could not move the stock forward (past the blade). Being eight feet behind the saw's off-switch, my only choice was to hold tight until the thermal overload tripped, or someone shut the saw down for me. Now think about what's more important; burning out the saw motor, or having a three pound chunk of oak sticking out of my ear? If I had let go, I would have maintained enough control over the large plank, but the small wedge would surely have been free to fly, and it was already heated up and sticky from blade friction. (More things could have happened, but that would get too lengthy.)
Although some circumstances leave the operator with no choice but to bail out, the majority of problems are best handled by holding fast.
Experience is the best teacher, but sometimes it is helpful to know where to start. The tools you have at your disposal will be the deciding factor in how operations are done. By using the tools you have wisely and creatively, you can accomplish many tasks which normally require special equipment.
2.1 Blade Selection
One of the common mistakes in using a table saw, is using the
wrong blade for a specific task. Choose the right blade for the task
being completed.
For shops on a tight budget, a good quality combination blade will do nearly every cutting operation. Even though I have a wall full of specialized saw blades, my combination blade is in the saw 70% of the time.
Using a blade that is too coarse on veneers and laminates will cause undue chipping. Using a blade which is too fine for ripping solid lumber can burn the wood, damage the blade, put undue wear on the motor, and even cause the wood to ride up over the top of the blade and cause a kickback. While I understand that many woodworkers cannot afford more than one blade, I am nonetheless a strong proponent of using the correct blade when you can afford to do so.
2.2 Thin Kerf Blades
Thin kerf blades were developed due to the popularity of
combination blades used on underpowered saws. Unfortunately, tool
equipment salesmen have lost sight of this in lieu of revenue. A full
kerf ripping blade will outperform a thin kerf combination blade
regardless what saw it is on. I am also a very strong opponent to
using thin kerf blades on the larger cabinet saws, as the stability
of the blade suffers needlessly.
2.3 Crosscut Binding
It is a fairly common operation to cut a piece of plywood on the
table saw which is wider than it is long. Regardless of grain
direction, this is overall, a crosscut operation. The primary issue
with this operation is binding. This occurs when the workpiece twists
in relation to the fence.
It is unwise to attempt to crosscut a piece which is very narrow with respect to its length without a miter gauge to hold the piece square. This discussion deals primarily with sheet products which have a length to width ratio no less than 2:1, where using a miter gauge is not generally feasible.
To complete large piece crosscuts, I grasp the far edge of the wood with my right hand and the closer edge with my left. With this posture, my hands tend to twist the workpiece clockwise, while the resistance of the blade tends to twist it counterclockwise. At the same time, my right foot is planted farther forward than my left foot. This twisting of my torso tends to hold the workpiece tighter to the fence.
Before I even start the cut, I double check to make sure that my hands are well clear of the cut. During the cut, I will concentrate on the fence-to-wood contact to see if there is any gap, but will frequently look back toward the blade to make sure it is clear. This is one of those operations where things can go wrong very quickly, and you should be comfortable with the saw before you try it. If your wood begins to bind, hold fast long enough to evaluate which direction you are binding. Maintain a very firm grasp, and correct the bind. The more sideways pressure you use to hold the wood to the fence, the less chance you have for binding. Also, it's a good idea to make sure that the table is well waxed. I prefer standard automotive wax because it lasts long, is easy to apply, and protects the metal surfaces from corrosion. (Contrary to many reports, this type of wax does not contain silicones)
2.4 Ripping Lumber and Sheet Products
One of the most common tasks on the table saw is the rip, yet
some experienced users still have some difficulty with it. I have
seen woodworkers ripping a long board by standing close to the saw
and pulling the board through in short, choppy, strokes.
The best method for ripping a long board is to take a stance at the back, left side of the board, and walk it into the saw. Although this requires dexterity while walking, it provides a smoother rip. I will always keep my left hand fairly far forward and my right hand on the end of the board. This stance allows me to have a little more pressure against the fence while standing well behind the saw.
On sheet products, I take a similar stance at the back left corner, not the center of the sheet. One thing that I do which is somewhat unusual, is that before the rip starts, I will deliberately hold the sheet crooked with only the front corner of the sheet touching the fence.
As I slowly ease the sheet forward, and hear the blade first make contact , I will carefully straighten the sheet tight to the fence. This ensures that the rip is started with the front of the sheet tight to the fence. As the sheet is carefully straightened, the blade has the tendency of holding the front in place while the back moves into the fence.
As I approach the saw, towards the end of the cut, I begin to move toward the center of the sheet to finish the cut. As the sheet nears the end of the cut, my concentration changes focus to the right hand half of the sheet, and both of my hands are also on this portion of the sheet. Once the sheet is completely cut into two pieces, I push the right hand piece clear of the blade. With the right hand piece clear of the blade, I then move the left hand piece to the left, away from the blade.
If you move the left hand piece before the right hand piece has fully cleared the blade, you will most likely end up jarring the right hand piece by mistake, and take a nick out of the back corner as it twists between the blade and the front of the fence.
2.5 Feed Rates
One of the most common errors I have seen on the table saw is feeding
the stock too slowly. The feed rate with which you can push stock
through is dependent on several issues: your ability to handle
the rate, the saw's ability to handle the load, the length of
the rip, and the type of material.
Starting with the power of the machine, you don't want to take a feed rate which excessively loads the motor, but you also don't want a feed rate which builds up too much heat. I have seen too many woodworkers rip lumber at such slow feed rates that they burn the wood and foul the blade. If you're burning your wood, you are probably moving too slow, or your blade is very dull.
When I am ripping solid lumber stock using the rip blade, I feed the stock though as fast as the blade will accept it (pretty much as fast as I can walk it into the blade and maintain a straight cut.)
When I am cutting sheet products like MDF and particle board, I will slow the rate down a little to get a cleaner edge, but it is still not a slow feed rate. When making a bevel cut with the laminate blade, I feed the stock through as fast as the blade allows. Here, the blade will be the limiting factor, as it won't allow more material to feed than it can cut.
To the extreme, on those few times when I cut acrylic sheet materials, the best cut is achieved with the fastest feed rate I can push. Ideally, I would slow the blade down, but that's not feasible for most saws.
The cut which has the slowest feed rate would either be a crosscut in MDF veneer with the laminate blade, or the same cut with the stacked dado head cutter.
2.6 Re-sawing on the Table Saw
 Re-sawing on
the table saw has the potential for danger, and extra caution should
be taken. If I need to re-saw a 2, 3, or 4 inch wide board into two
thinner boards, I set the fence at 5/16" (or what ever thickness you
need) with the blade height set to less than half the height
of the board.
Re-sawing on
the table saw has the potential for danger, and extra caution should
be taken. If I need to re-saw a 2, 3, or 4 inch wide board into two
thinner boards, I set the fence at 5/16" (or what ever thickness you
need) with the blade height set to less than half the height
of the board.
I will push the board through the saw and then flip it end-for-end and push it through again. When this is done, the board will look like a capital "H", with the strip connecting the two pieces about 1/8" thick. ( If your saw is lacking power, or if the rip is fairly deep, you can make the rip in several passes on each side, but always stop short of going all the way through)
After making the two rips, I just break the center strip and pull the two pieces apart. A bandsaw could be used, but you run the risk of gouging the surface. This center strip is small enough to sand off fairly easily by hand, but I usually run the pieces through the planer or widebelt sander for consistent thickness and clean surface.
2.7 Narrow Rips
Making a narrow rip uses a similar procedure as above, but the
blade is set to normal cutting height. You begin the rip just as you
would any other rip, but you stop before you complete the entire
length. As you approach the last two feet of your rip, lift up on the
back end of the board (the end you are holding). If you lift the
front end, the furthest end from you, you run the risk of it catching
the back of the blade and getting a kickback.
Make sure to lift the board cleanly, sharply, and without twisting. Flip the board end-for-end and complete the rip from the other side. When I am making the second rip, I will hold both sides of the original saw kerf, so that when I lift the board away from the blade for the last time, I have a grip on both pieces. I also try to hold the kerf open so it doesn't bind on the blade, or gouge deeper than it should. This method does not work for rips shorter than three feet however, and for these, a normal rip with a push stick is the only method.
3.0 Push Sticks
Since the original time that I wrote this article (a long time ago), I have rewritten this section and made a separate article out of it. If you read that article, you will see that I will not use a common push stick, but instead use a "push shoe".
